- This topic is empty.
-
AuthorPosts
-
2025-12-26 at 6:48 pm #8085
Understanding CV Joint Ball Operating Conditions
Stress Profile Analysis
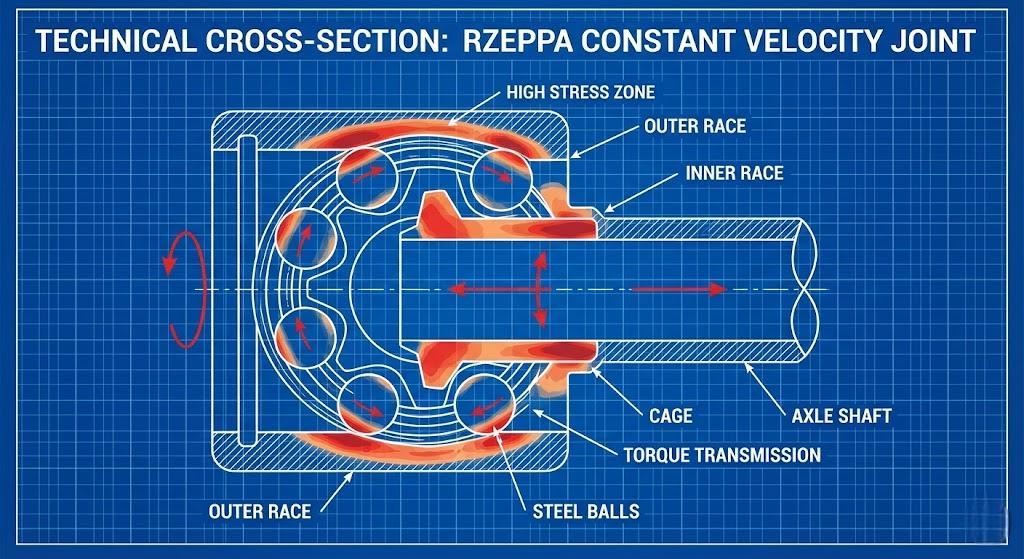
CV joint balls operate in one of the harshest environments in automotive powertrains:
-
Contact Stress: Hertzian contact pressures in CV joints create demanding load conditions during torque transmission
-
Cyclic Loading: Each ball experiences tens of millions of stress cycles over a typical vehicle's lifespan
-
Angular Misalignment: Operating angles create non-uniform load distribution across ball surfaces
-
Contamination Exposure: Despite boot protection, microscopic abrasive particles cause three-body wear
-
Thermal Cycling: Rapid temperature changes during braking test material stability
Standard through-hardened chrome steel balls with uniform HRC 60-65 hardness often fail prematurely in CV joints due to insufficient core toughness—the hard but brittle microstructure cannot adequately absorb impact energy during sudden load spikes, leading to subsurface crack initiation and eventual spalling.

Why Surface Engineering Matters
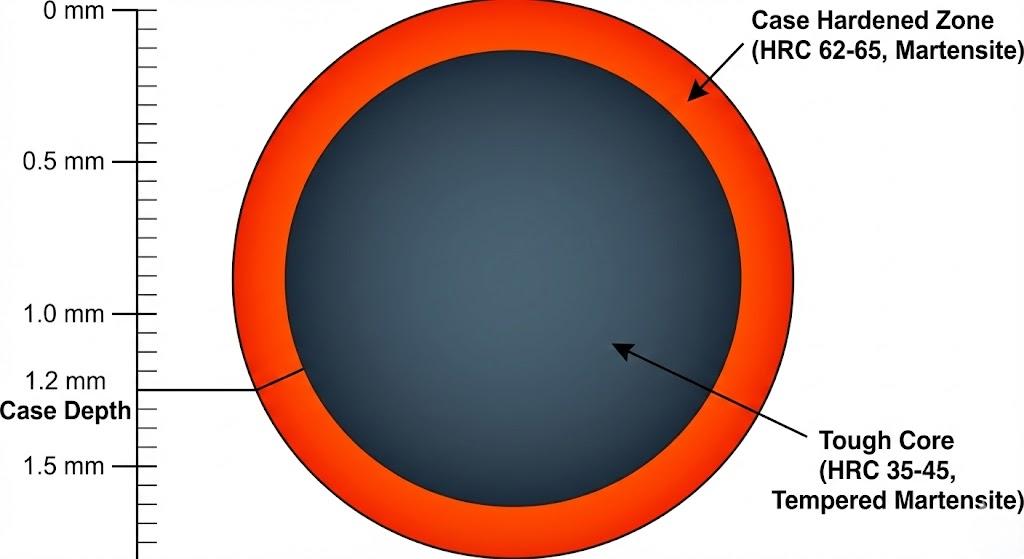
The ideal CV joint ball exhibits gradient mechanical properties:
Surface Zone (0-1.2mm depth):
-
Hardness: HRC 62-65
-
Microstructure: Fine tempered martensite with retained austenite
-
Residual stress: Compressive (beneficial for fatigue resistance)
Core (>1.2mm depth):
-
Hardness: HRC 35-45
-
Microstructure: Tempered martensite with fine carbides
-
Impact toughness: Sufficient to resist shock loading at low temperatures
This gradient structure is achieved through carburizing (case hardening) followed by precision tempering—a dual heat treatment process that manufacturers with IATF 16949:2016 certification can consistently control.

Material Specifications for CV Joint Steel Balls
Base Steel Requirements
CV joint balls are typically manufactured from low-carbon alloy steels rather than high-carbon bearing steels:
Primary Material: SAE 8620 (AISI 8620 / DIN 21NiCrMo2)
-
Carbon: 0.18-0.23% (enabling carburization)
-
Chromium: 0.40-0.60% (hardenability depth)
-
Nickel: 0.40-0.70% (core toughness)
-
Molybdenum: 0.15-0.25% (temper resistance)
Alternative Material: SAE 4320 (AISI 4320 / DIN 17NiCrMo6-4)
-
Used for heavy-duty applications (SUVs, commercial vehicles)
-
Higher nickel content (1.65-2.00%) provides enhanced low-temperature impact resistance
Why Not GCr15/52100 Bearing Steel?
Traditional bearing steel balls contain 0.95-1.05% carbon—too high for effective carburizing. Through-hardening these steels creates a uniformly hard structure lacking the ductile core necessary for CV joint shock absorption. Carburized low-alloy steels demonstrate superior performance in CV joint-specific loading conditions compared to through-hardened high-carbon bearing steels.
Dual Heat Treatment Process: Carburizing + Tempering
Stage 1: Gas Carburizing (Case Hardening)
Process Parameters:
-
Carburizing Temperature: 900-930°C
-
Carbon Potential: 0.85-1.05% (controlled via endothermic gas atmosphere)
-
Duration: 4-8 hours (depending on required case depth)
-
Target Case Depth: 0.8-1.5mm (measured at HRC 50 hardness level per ASTM E384)
Critical Control Points:
Our heat treatment line, assessed per the AIAG CQI-9 Heat Treat System Assessment standard, maintains:
-
Carbon potential variation control within specification
-
Temperature uniformity across furnace chamber
-
Atmosphere dew point control for process consistency
Quenching:
Immediate oil quenching (80-120°C quench oil) transforms the high-carbon surface layer to martensite while the low-carbon core forms lower bainite/martensite mix.
Stage 2: Precision Tempering
Process Parameters:
-
Tempering Temperature: 160-180°C
-
Duration: 2-3 hours
-
Cooling: Air cooling to room temperature
Metallurgical Objectives:
-
Reduce residual stresses from quenching
-
Stabilize retained austenite in surface layer
-
Achieve final surface hardness: HRC 62-64
-
Maintain core hardness: HRC 38-42
Quality Verification:
Using our in-house Rockwell hardness tester , we perform:
-
Surface hardness: Multiple measurements per batch (acceptance: HRC 62 minimum per customer specification)
-
Core hardness: Destructive sectioning of sample balls (statistical sampling per IATF 16949)
-
Case depth verification: Microhardness traverse testing per ASTM E384
Dimensional Precision & Geometric Tolerances
Grade Requirements for Automotive Applications
CV joint OEMs typically specify precision grades per ISO 3290-1 standard. Common automotive specifications include Grade G20 or better:
ISO 3290-1 Grade G20 Specifications:
-
Spherical deviation (sphericity): 0.5 µm maximum
-
Variation of ball diameter: 0.5 µm maximum
-
Variation of ball lot diameter: 1.0 µm maximum
-
Surface roughness: Ra 0.032 µm maximum
Our precision grinding and lapping process targets tighter tolerances, providing margin for:
-
Thermal expansion during heat treatment
-
Minimal geometric distortion post-carburizing
Roundness Verification
Using our Talyrond roundness measuring instrument , we conduct:
-
Statistical inline inspection for automotive batches
-
Polar plot analysis identifying geometric deviations
-
Batch certification with measurement reports per IATF 16949 PPAP requirements
Why Roundness Matters in CV Joints:
Out-of-roundness conditions create load concentration points, accelerating contact fatigue. Properly manufactured balls within specification exhibit extended service life in durability testing versus balls with larger geometric deviations.
Microstructure & Metallography Analysis
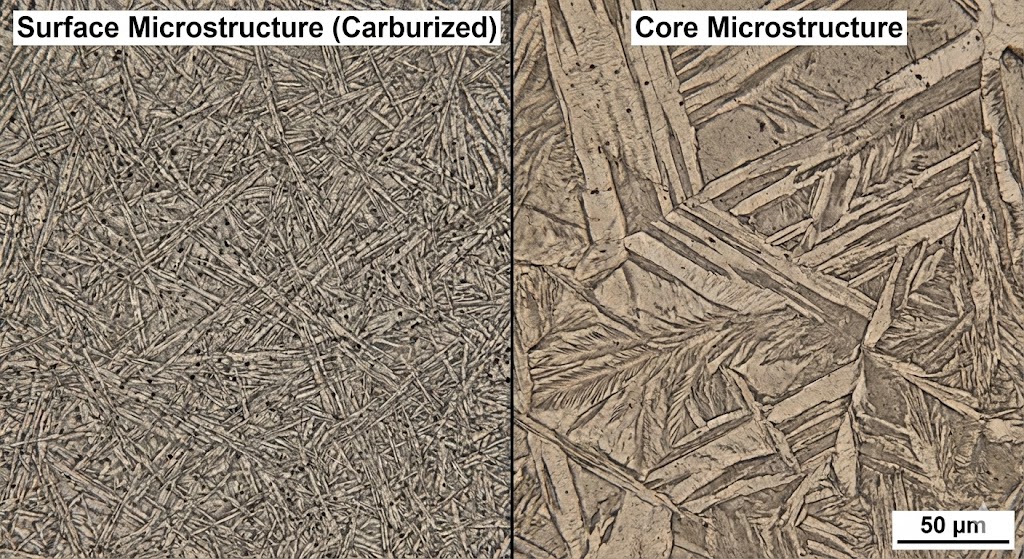
Optimal Microstructure Characteristics
Surface Layer (0-0.8mm):
-
Matrix: Fine tempered martensite
-
Carbides: Spheroidized cementite particles, fine distribution
-
Retained Austenite: Controlled level (typically 5-10% measured via X-ray diffraction)
-
Grain Size: Fine grain structure per ASTM E112 (prevents brittle fracture initiation)
Transition Zone (0.8-1.5mm):
-
Gradual hardness gradient from surface to core
-
Mixed martensite and bainite structure
-
Smooth transition minimizing stress concentration
Core (>1.5mm):
-
Matrix: Tempered martensite with fine pearlite
-
Carbide Distribution: Uniformly dispersed for crack arrest
-
Prior Austenite Grain Size: Controlled per ASTM E112
Defect Detection & Prevention
Our optical emission spectrometer screens incoming steel for:
-
Phosphorus: <0.015% (prevents grain boundary embrittlement per SAE specifications)
-
Sulfur: <0.015% (minimizes MnS inclusions that can initiate cracks)
-
Non-metallic inclusions: Evaluated per ASTM E45 methodology
Hydrogen Embrittlement Prevention:
Post-carburizing, all CV joint balls undergo controlled tempering cycles that reduce hydrogen content—critical for preventing delayed cracking in high-stress applications.

Performance Testing & Quality Validation
Fatigue Life Testing
Rolling Contact Fatigue (RCF) Test:
CV joint ball suppliers perform endurance testing to validate performance:
-
Test Fixture: Multi-ball configuration under controlled radial load
-
Speed: Specified RPM matching application conditions
-
Duration: Extended cycle testing per customer requirements
-
Pass Criteria: No spalling or pitting beyond acceptance limits
Our vibration measurement system detects subsurface damage through:
-
Acoustic emission monitoring: Crack initiation detection
-
Surface vibration analysis: Early warning of impending failure modes
Low-Temperature Impact Testing
Charpy V-Notch Testing (Per ASTM E23):
For applications requiring cold climate performance:
-
Test Temperature: -40°C (simulating extreme cold climates)
-
Sample Preparation: Notch machined in core region (post-sectioning)
-
Evaluation: Impact energy measurement to verify core toughness
Through-hardened balls demonstrate brittle behavior at low temperatures, while properly carburized CV joint balls maintain better ductile fracture resistance.
Dimensional Stability Testing
Thermal Cycling Test:
-
Profile: Temperature cycling between operational extremes over multiple cycles
-
Measurement: Diameter change measurement via precision instrumentation
-
Evaluation: Dimensional stability verification
This validates tempering adequacy—inadequately tempered balls can exhibit dimensional changes due to retained austenite transformation during service conditions.
OEM Qualification Standards & Certifications
IATF 16949:2016 Requirements
Automotive CV joint ball suppliers must demonstrate:
Process Capability:
-
Statistical process control for critical dimensions (diameter, hardness, case depth)
-
Quality targets meeting customer-specific requirements
Traceability:
-
Heat lot tracking: Every batch linked to heat treatment process parameters
-
Material certification: Mill test reports traceable to steel source
Our IATF 16949 certified facility maintains:
-
SPC monitoring of heat treatment parameters
-
Full metallurgical traceability from raw material to finished ball
-
Customer-specific PPAP documentation including dimensional reports, material certifications, and performance test data
OEM-Specific Testing Protocols
Major automotive manufacturers maintain proprietary testing requirements:
General Motors GMW Standards:
-
Surface distress resistance verification
-
Grease compatibility testing
-
Dimensional stability requirements
Volkswagen VW Standards:
-
Microstructure documentation requirements
-
Non-metallic inclusion evaluation per ASTM E45
-
Material chemistry verification
Ford WSS Standards:
-
Residual stress profile measurement capabilities
-
Surface integrity verification
Common Failure Modes & Root Cause Analysis
Premature Spalling
Root Causes:
-
Insufficient Case Depth:
-
Symptom: Spalling initiates at case-core interface
-
Detection: Microhardness traverse per ASTM E384 shows transition depth
-
Prevention: Controlled carburizing time and carbon potential management
-
Excessive Retained Austenite:
-
Symptom: Subsurface transformation during service
-
Detection: X-ray diffraction reveals austenite content
-
Prevention: Optimized tempering cycle parameters
-
Grinding Burns:
-
Symptom: White layer (untempered martensite) forms during aggressive grinding
-
Detection: Metallographic examination reveals white-etching areas, hardness anomalies
-
Prevention: Controlled grinding parameters with adequate coolant
Brittle Fracture in Cold Climates
Root Cause: Inadequate core toughness due to:
-
Base steel with insufficient alloy content
-
Excessively high core hardness from improper quenching
-
Hydrogen embrittlement risk
Verification Testing:
-
Section balls and perform Charpy impact testing at specified temperatures
-
Conduct hydrogen analysis if required by specification
-
Verify material chemistry meets specification requirements
Dimensional Instability
Root Cause: Retained austenite transformation:
-
Under-tempering leaves unstable austenite
-
Service temperature cycling can trigger transformation
-
Volume expansion causes dimensional changes
Prevention:
-
Implement appropriate tempering cycles
-
Consider cold treatment if specified by customer
-
Verify dimensional stability via thermal cycling test
http://www.cnballs.cn
Changzhou Eurasian -
-
AuthorPosts
- You must be logged in to reply to this topic.